Be Your Own Office Manager

Mark Suster took up the challenges that come with scaling a small, scrappy startup office culture into a decent-place-to-work culture here. In my last post I reflected on my first, “scrappy” remote office and the challenges it presented. Just like a seed stage startup, for me the scrappiness was charming, exciting, fun. The novelty of working from home, the freedom of not having a commute, and even the challenges of working in a significantly worse environment were all new and interesting. That newness made it possible to put up with the pain and still do some really great work.

But over the years, as I increased the amount of remote work that I do until now, where it’s my full time job, I had to scale up my office, just like those scrappy startups have to when they start to encounter a bit of success. Suster pointed out that for a startup making the transition, one of the most important investments they can make is to hire a great office manager / admin person. Just that phrase reminds me of two very impressive admin’s I’ve known.

At Microsoft, Amy was the admin for the Outlook team and she was awesome! For any question you had, she would find an answer. In a big company, political environment, she knew just who to talk to to get things done, but she also always had time to just shoot the breeze. For me, the team was never the same after she left to work at a smaller branch office.

During my time at Fog Creek, if Joel was the head of the company, Liz was the heart. She was just like Amy in so many ways, but at a small company she handled logistics more than politics, and made sure everything ran perfectly. She impressed me from our first conversations in the hiring process, she helped convince my wife that New York would be a great adventure for our family (and it was), and she’s still teaching me great stuff on her new blog: check out Cupcakes in Paradise.

Since leaving Fog Creek, I haven’t had an awesome office manager for one simple reason. I am my own office manager. Remote work is the future of work, and I’m sure that in time, as an industry, we’ll build up a really nice infrastructure around remote work that will handle most home “office management”. But the fact is that it’s still a ways out there. For now, every remote worker is their own office manager.

Doing that job well is not easy. What is easy is waking up to work on Monday and realizing your home office hasn’t been cleaned in a couple weeks. A thin layer of dust covers any surface area not in regular use. I don’t have someone refilling the candy jar or keeping the free drinks stocked. I’m not getting the standard issue laptop, desk, chair, speakers, keyboard, etc. I have to pick all that stuff out, which might be a bad idea for an OCD perfectionist. And don’t even think about the extra stuff, like fresh flowers in the restroom each week, catered lunches, funky artwork on the office walls, etc.

A corner of my office that needs “management”

A corner of my office that needs “management”

If I were a good office manager, I would do all the stuff that Suster recommends at the end of his post. I would have a comfortable chair, clean bathrooms, and a stocked kitchen. I would put up pictures, and make things comfortable. I spend 8+ hours a day in my home office, and sometimes I feel like it loses out to the rest of my home in terms of maintenance and upkeep. It’s time to change that.

How do you manage your home office? What do you miss about having an office manager?

A Bend in the Hallway

The first home office I remember having, and actually using occasionally as an office, was a bend in the hallway of our home when I worked at Microsoft. Yep, that’s right, just a bend in the hallway. I would work from home on rare occasions when I needed to stay home for some reason (e.g. contractors coming). I had a dinky little desk, a horrible chair that couldn’t roll on the carpeted floor very well, and a small monitor. This bend in the hallway had three doorways within reaching distance, opening into two kids bedrooms and their common bathroom.

A bend in the hallway, or in other words, my home office

A bend in the hallway, or in other words, my home office

Despite all of the negatives of such a ridiculous home office, I have a distinct memory of one very productive day when I worked from home. I can’t even remember why I couldn’t go into work that day. But we were close to shipping Office 2007, and I had a ton of bugs on my plate. I sat down at the desk, my wife helped keep our two boys under the age of five at the other end of the house, and I cranked through more bug fixes than I had in the previous week. It really opened my eyes to the possibilities that remote work opens up.

That little home office eventually moved into half of an undersized room, and I still only used it occasionally, maybe once a month, for my day job. But I had a door that I could shut. Whew!

Over the next few years, my home office was part of our homeschooling room, a commandeered child’s bedroom, a corner of the master bedroom (that didn’t work out very well), and back to a bedroom sandwiched between kids rooms. I went from working only rarely at home to having a fully remote job, first at TrackAbout , and now at Articulate .

Through the process I’ve learned a lot about what works in a home office, what doesn’t work, and what is up to personal preference. So, now it’s time to build my own. We’ve got an extra bay in our garage and last week a contractor came in to give us an estimate for the work it will take to turn it into a real home office.

My awesome future office

My awesome future office

I’ll be documenting the process here, along with other tips for doing successful remote work.

What was your worst home office? What is your ideal home office? I’d love to hear your ideas in the comments.

Introducing SpecEasy

Last week, TrackAbout pushed SpecEasy, its first open source project, up to GitHub. I thought I’d give a little history and introduction to the project.

For a good chunk of last year Jeff Sternal and I did remote pair programming, and we both wanted to practice strict TDD/BDD to further develop our thoughts on the practice. We’d both done enough to feel the benefits it gave us in forcing us to think about the design of the code. But we wanted a better feel for how, and if, it changed our speed and code quality.

Our biggest challenge was the large amount of friction that came when trying to follow Red/Green/Refactor. First, our builds were slow, so we worked to speed them up. After that, the in-house BDD framework we were using, which was almost identical to SpecsFor, was way too verbose. If you check out the first example on the SpecsFor home page you’ll see that it takes 40 lines to make three assertions, and if they wanted to add any more, it would be at least 6 additional lines per assertion. This is not the readability increasing whitespace you’re looking for.

In looking at other possibilities we found NSpec and admired the general approach, but we wanted to avoid using a new test runner. We also didn’t really click with the terminology used, because it felt like it made the tests harder to read, and therefore harder to understand.

We felt that if we could make the test/spec writing much smoother, the whole process of TDD/BDD would be more productive and start to give us the gains we hoped for. So over the course of a few sprints we developed SpecEasy1 and used it in developing our assigned backlogs with a BDD approach.

Now would be a good time to check out the readme’s for SpecsFor, NSpec, and SpecEasy.

Our main goal in writing it was to reduce the friction. We wanted the tests be both terse and as readable as possible. We also wanted to eliminate or reduce the duplication that our SpecsFor approach led to. NSpec pointed the way to making things more terse, though we did change quite a few minor things (terminology, syntax) to make it read easier for Jeff and I. We also wanted it to work seamlessly with NUnit, since we already had thousands of NUnit tests in both our website and mobile app solutions. At the time, our code made heavy use of Ninject for resolving dependencies and newing up objects, so we also wanted a solution that (like our previous one) could use a RhinoMocks Ninject mock repository in the test code.

Two things came out of this work that we weren’t really shooting for but that are really nice. Both are side effects of building up tests using strings that describe what’s going on. One of our goals was to reduce how much typing our old SpecsFor-like BDD framework required. In SpecsFor, to reuse test setup required inheritance to build up contexts for tests, or just copying the setup code around. If we used inheritance we were required to repeat aspects of a context in the inheritance syntax, so either way, duplication of information in the tests. But by building up tests using the simple Given/When/Then of BDD, nested contexts, and strings to explain what was going on, we eliminated a lot of the duplication of test descriptions.

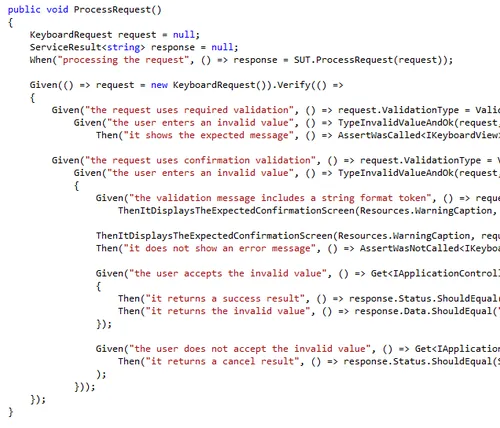
The first aspect of this is that by putting those strings at the front of each line of code, they become a syntax-highlighted description of the test code. Check out this picture of a simple set of tests for an on-screen keyboard:

Machine generated alternative text: public void ProcessRequest() Keyboardkequest request = null; ServiceResult response = null; When(”processing the request”, () => response = SUT.ProcessRequest(request)); Given(() => request = new KeyboardRequest).Verify(() => { Given(”the request uses required validation”, () => request.ValidationType = Valic Given(”the user enters an invalid value”, () => TypelnvalidValueAndOk(request. Then(”it shows the expected message”, () => AssertWascalled request.ValidationType = Given(”the user enters an invalid value”, () => TypelnvalidValueAndOk(request. { Given(”the validation message includes a string format token”, () => reqw ThenltuisplaysTheExpectedConfirmationScreen(Resources .WarningCaption, ThenltDisplaysTheExpectedConfirmationScreen(Resources .Warningcaption, req Then(”it does not show an error message”, () => AssertWasNotCalled Get response.Status.ShouldEquali Then(”it returns the invalid value”, () => response.Data.ShouldEqual(’ )); Given(”the user does not accept the invalid value”, () => Get<IApplicatior Then(”it returns a cancel result”, () n response.Status.ShouldEqual( ); ));

By reading through the red strings, you can get a pretty good feel for what the test is checking, without trying to decipher the actual code performing the test. Because the tests are self-documenting, it’s easy to read the code and add new tests, which is a common thing to do in large codebases.

The second benefit is closely related, but comes in the authoring stage. When writing each statement of a test, we’d start by writing the description of what it would do. This let us think about the test in everyday language. But then we’d immediately translate that description into a closure that actually did the work. The flow that came from doing that worked surprisingly well. And while SpecsFor can be used in a similar way, the additional work required by its more verbose syntax eliminated that flow that we sought, which is so important for effective BDD/TDD.

Once we got things to a point that we really liked using it, we shared it with the TrackAbout team, and others on the team have since made further contributions, including its current name and a sweet logo (thanks, Mike!). We released it on GitHub last week as the first open source project TrackAbout has developed. In addition to sharing it with the world, part of the reason we’re making it public is because there are further changes we’d like to see happen. SpecEasy is far from perfect.

The use of closures to capture variables that are then used while the tests are run leads to some weird quirks. You need to declare variables in your method itself (not within the anonymous delegates that get assembled into actual tests), but you need to initialize the variables in those anonymous delegates, so they get reset when running through different assertions. I’m not really sure how we can improve this aspect of the experience, but it’s something I’d like to spend more time thinking on, and get ideas from the community.

Because we’re using nested Given calls to build up contexts for running tests, and asserting different things, different (but related) contexts have been built up, it can occasionally be hard to get the right parentheses and bracket nesting. Mike Mertsock recently made a great change to reduce the nesting in one way, but I believe there is more we could do to clean up the syntax, further reducing the friction of writing tests.

There are lots of smaller issues as well. Right now, SpecEasy uses Nunit, Ninject, and RhinoMocks. It would be nice to make the usage of those tools optional, so that you can use your favorite test runner and mocking framework. We should make a public NuGet package. We could use an NUnit extension to make each assertion into separate test. In practice, it would be nice to have an easier way to specify multiple Given clauses. And the list goes on.

Anyway, if TDD is your thing, try it out. And if you want to help us solve the remaining issues, just fork the code.

Notes

  1. SpecEasy was originally called NuSpec internally

TrackAbout Tweaks: Windows CE Emulator Images

So, in my attempts to get rid of the gaps in the DataGrids, QA discovered that when TrackAbout was installed on a Windows CE device (as opposed to Windows Mobile) the behavior was slightly different. First of all, with my initial changes, horizontal scrollbars always showed up. When going back and looking at older versions of TrackAbout, they often still appeared.

The big challenge in getting these issues fixed was that I did not have an actual Windows CE device. Actually, I don’t have any device, and do all of my development and debugging on either the device emulator or using our simulator. Our simulator is a regular windows program that displays the same screens that you see on the device, but it runs much faster. It’s a better way to quickly test things during development, even though the fidelity to the actual end-user experience is sometimes low. When we’re ready to hand off our code to QA, we make sure to test it in the device emulator, since it’s a much higher fidelity testing experience.

Unfortunately, in addition to not having a Windows CE device, I did not have a Windows CE device emulator image. I asked around of the devs on the team, and it turned out no one had an image. We all used Windows Mobile device images, which are pretty easy to get online. Some said it was impossible to get a Windows CE image.

But if I couldn’t get a Windows CE image then I only had two options. Either have a new device bought so I could more easily test and figure out what was going on. Or do the slow cycle that involved me making a change (through educated guesswork), handing off to QA, having them show me (via screen sharing) the results, and then making a new educated-guesswork change. Not fun. Not really even worth trying. So instead, I decided to do the “impossible” and find out how I could get a Windows CE device image.

And what I found out is that Microsoft does not make it easy to do. Neither do the device manufacturers. I figured I could find a download on the support page of one of the device manufacturers that would let me do the testing I wanted. But after much fruitless searching I gave up on that. I suppose I could have pushed harder by calling the support departments, but I was doing this in my free time. I also figured Microsoft would have a pack of different Windows CE emulator images that I could downlad. But no. They only make images for Windows Mobile/PocketPC available. It turns out that if you want a Windows CE emulator image, you have to make it yourself.

So here are the rough steps that I followed:

  1. Make sure you have Visual Studio 2005
  2. Download and install Windows CE
  3. Create a Windows CE project?
  4. Run Platform Builder from within Visual Studio 2005
  5. Choose an emulator image
  6. Choose a handheld device
  7. Add the features you need in your image
  8. Build the image
  9. Find where it got built
  10. Create a Device Emulator config file that points to the image
  11. Run it in the emulator
  12. Turn on DMA connections

I had to download the Windows CE trial edition so that I could create a Windows CE runtime. These are typically used to build images for actual hardware that manufacturers are testing before they release a new product. Windows CE has a “platform builder”, which is a plugin to Visual Studio 2005 (yes, 2005!), that makes it possible to create a Windows CE “platform” with certain features turned on or off. Once you have a platform defined, you can build an image. It took quite a few trial runs to get the image just made in a way that it could actually be used in the Device Emulator. Once there, it was very much a barebones install of Windows CE, and I got to track down odd tips like how to turn on DMA sync so ActiveSync would work, and how to get the .NET CF installed. But in the end, I had a working Windows CE emulator image running our software.

What is nice is that, once I had the emulator, it was simple work to figure out what the right metrics were to make the DataGrid gaps disappear. Since then, it also helped me track down another Windows CE-specific bug that cropped up.

TrackAbout Tweaks: Building Faster

One of the challenges we face at TrackAbout is the speed of our builds. TrackAbout Mobile, our compact framework app that runs on rugged Windows CE devices, would take between one and two minutes to do an incremental build. If you add on the time to run unit tests, or deploy to an emulator and start testing manually, the development cycle really starts to slow down. Since Jeff and I have been experimenting with doing “TDD like you mean it”, this was really a pain.

As it turns out, there is an easy way to speed up builds that use the compact framework. One of the “features” that Microsoft provides for compact development is a platform verification check. This check verifies that all of the features of the .NET framework that you use are available on the platform you are targeting with your code. That’s so you don’t deploy some code to a device that just explodes when it tries to access a non-existent property in the compact framework, which actually exists in the full .NET framework.

And this little step takes the majority of our build times. Although it’s definitely something we want to have run, it’s not something we need to have run on each build of our app. So to speed up our builds we made it a conditional step and made it possible for the developers to turn it off on their debug builds. First, we checked in a change to our project files that set a new property (SkipPlatformVerification) to true in debug builds. Then, when an individual developer gets sick and tired of slow builds, they can go to their MSBuild targets file and change a single line to make the PlatformVerificationTask conditional on that variable.

To enable slower builds, they just need to modify one line in the C:\Windows\Microsoft.NET\Framework\v3.5\Microsoft.CompactFramework.Common.targets file.

The line:

Name="PlatformVerificationTask">

Should become

Name="PlatformVerificationTask" Condition="'$(SkipPlatformVerification)' != 'true'" >

By making the suppression of that task dependent on action by developers, it means all our official builds (from our jenkins server) still do the task. By making it only happen in debug builds, its still easy for developers to make sure their code will run on the compact framework. And by making it possible to skip the step in daily development, we sped up our normal build times from 1-2 minutes down to 5-25 seconds.

The other day I was on the phone with another developer as he made the change to his targets file and rebuilt. He kicked off the build, leaned back in his chair, then freaked out because his build was already done.

It made my day.